For renters, new homeowners, or anyone who hates drilling holes in walls or window frames, finding the right window treatments is tricky. Curtains are easy but lack precise light control, while traditional blinds need permanent hardware that damages surfaces. No-drill vinyl blinds solve this—affordable, lightweight, and installable in minutes without a drill. But many struggle with wobbly mounts, ill fits, or premature wear, especially when comparing them to sturdier aluminum Venetian blinds or wooden Venetian blinds.
In this guide, we’ll tackle the most common frustrations with no-drill vinyl blinds, share step-by-step installation tips, and break down how to use and maintain them for long-lasting performance. We’ll also clarify how they stack up against Venetian blinds variants, so you can decide if they’re the right fit for your space. Whether you’re outfitting a rental apartment, a child’s room, or a temporary space, this post will turn you into a no-drill vinyl blind pro.
Why No-Drill Vinyl Blinds Are a Game-Changer
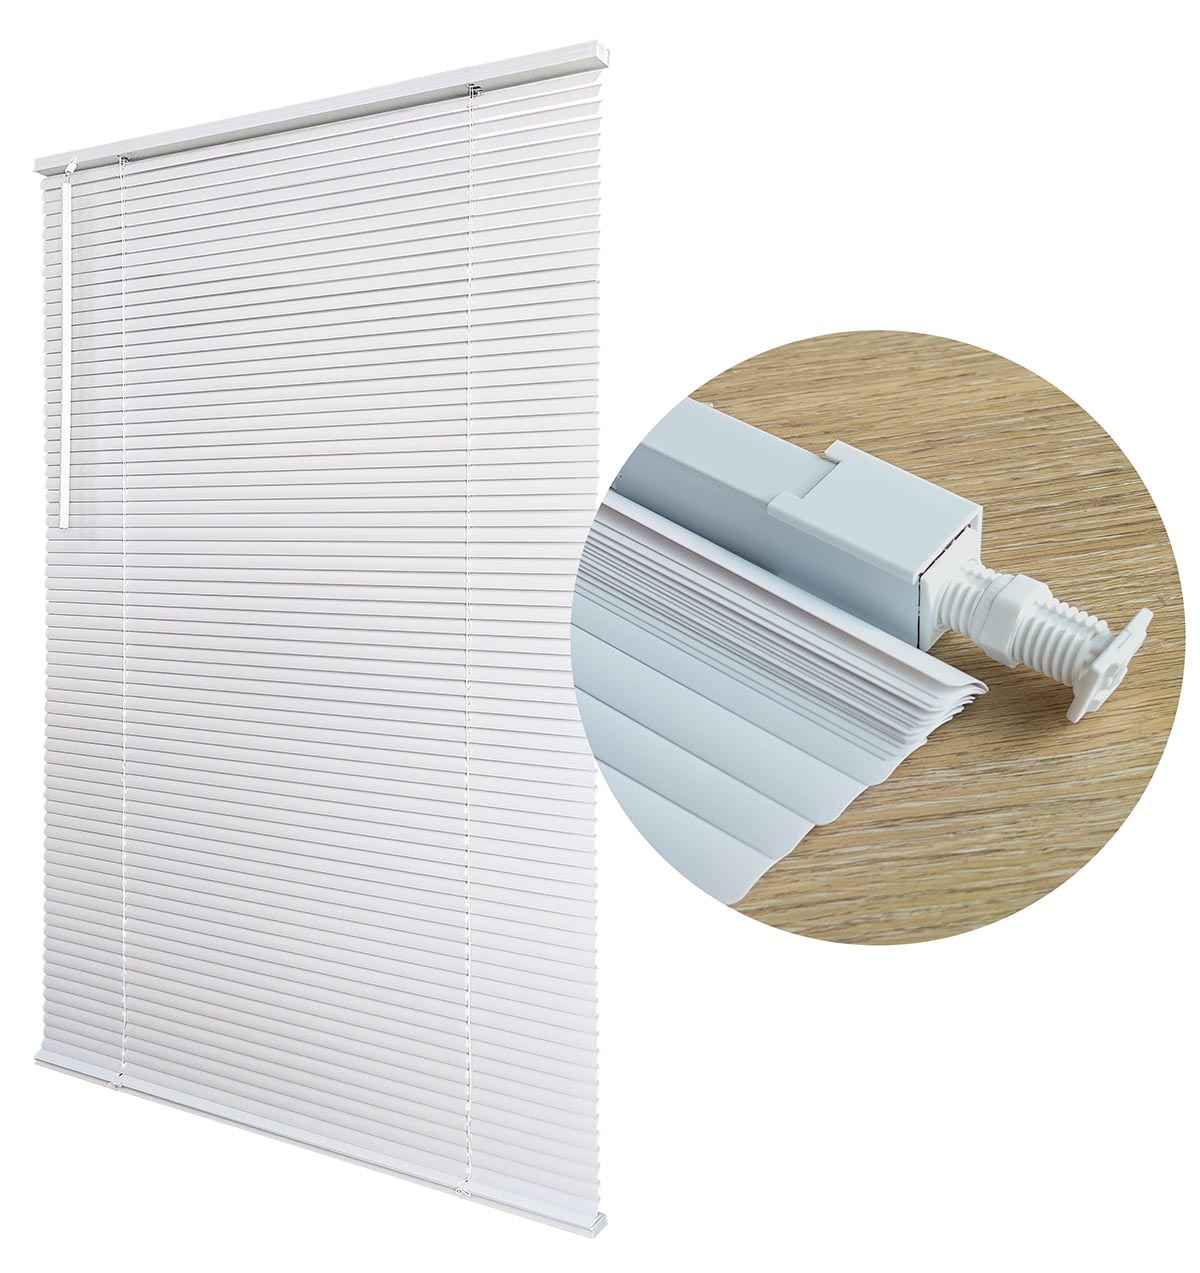
No-drill vinyl blinds (also called adhesive or clip-on vinyl blinds) are designed for convenience. They use strong adhesive strips, tension rods, or clip-on brackets to attach to window frames—no drilling, no screws, no permanent damage. This makes them ideal for renters who need to avoid altering their space, or homeowners who want a quick, reversible window treatment solution.
Vinyl’s durability boosts its appeal: it’s water-resistant, easy to clean, and budget-friendly versus other materials. Unlike faux wood Venetian blinds, which can be costly, no-drill vinyl blinds offer affordable privacy and light control for bathrooms, kitchens, bedrooms, and small windows. They’re also lightweight, so they won’t strain delicate frames—worth noting if you’re used to the heft of metal or wood Venetian blinds.
That said, no-drill vinyl blinds aren’t a one-size-fits-all solution. They work best on smooth, clean surfaces (like painted wood, vinyl, or metal frames) and are better suited for small to medium windows—large windows may require the sturdier support of drilled Venetian blinds. We’ll dive into how to choose the right size and style later, but first, let’s address the biggest pain point: installation.
Common No-Drill Vinyl Blind Installation Problems
The biggest myth about no-drill vinyl blinds is that they’re ”install and forget.” In reality, poor installation leads to most issues—wobbly blinds, adhesive failure, or gaps that let in unwanted light. Let’s walk through the most common problems and how to avoid them.
Q1: The Adhesive Brackets Keep Falling Off—How Do I Get Them to Stick?
Adhesive failure is the top complaint with no-drill vinyl blinds, and it almost always comes down to improper surface preparation. Vinyl blinds rely on strong, pressure-sensitive adhesive, but dirt, dust, grease, or even residual paint will prevent a secure bond.
Fix this with thorough surface prep: wipe the mounting area with a microfiber cloth and rubbing alcohol to remove oils and debris. Let it dry fully (at least 10 minutes) — moisture weakens adhesion. Press brackets firmly for 30–60 seconds, then let them set for 24 hours before hanging blinds to ensure the adhesive cures completely.
If your window frame is textured (e.g., stucco or rough wood), adhesive brackets may not work. Opt for tension rod-mounted no-drill vinyl blinds instead—they fit inside the window recess and stay in place with pressure, no adhesive required. Just make sure to measure the recess width accurately (add 1–2 inches to the blind width for a snug fit) to avoid slipping.
Q2: My No-Drill Vinyl Blinds Are Crooked or Gappy—How to Get a Perfect Fit?
Crooked blinds or light gaps are usually caused by incorrect measuring or misaligned brackets. Unlike cordless Venetian blinds, which often come with leveled mounting hardware, no-drill vinyl blinds require careful alignment to look polished.
Start with accurate measurements. For inside mounts, measure the recess’s top, middle, and bottom widths — use the smallest to ensure a fit. For outside mounts, add 2–3 inches to the window’s width and height to block light gaps. Mark bracket positions with a pencil and use a level to keep them straight—even a tiny misalignment causes crooked blinds.
If gaps persist along the sides, add adhesive light-blocking strips (available at home improvement stores) to the edges of the blinds. These are thin, flexible, and blend with vinyl, eliminating unwanted sunlight without damaging the blinds.
Q3: Can I Install No-Drill Vinyl Blinds on Sliding Doors or Large Windows?
No-drill vinyl blinds work best on windows up to 36 inches wide. Sliding doors or large windows (wider than 40 inches) are too heavy for adhesive brackets—even the strongest adhesive will fail over time. For these spaces, you have two options:
First, opt for heavy-duty tension rod no-drill vinyl blinds. Look for rods rated for at least 10 pounds, and choose blinds with reinforced headrails to distribute weight evenly. This works for sliding door side windows but may not be sturdy enough for the main door panel.
Second, consider a hybrid approach: use no-drill vinyl blinds for small windows and aluminum Venetian blinds (with drill-free tension mounts, if available) for large sliding doors. Aluminum Venetian blinds are sturdier than vinyl, so they can handle wider spans without sagging, and some models come with tension rods to avoid drilling.

How to Use & Maintain No-Drill Vinyl Blinds for Longevity
No-drill vinyl blinds are low-maintenance, but a little care goes a long way. Unlike wooden Venetian blinds, which require special cleaners, vinyl is forgiving—here’s how to keep them looking and working like new.
• Daily Usage Tips
Vinyl blinds have lightweight slats, so handle them gently to avoid bending or breaking. When raising or lowering, use both hands to distribute pressure—pulling on one side can warp the headrail. For corded models, avoid yanking the cord—this can damage the lift mechanism. If the blinds stick, gently wiggle the slats or adjust the brackets (loose brackets often cause sticking).
If you have pets or kids, opt for cordless no-drill vinyl blinds (yes, they exist!). Like cordless Venetian blinds, they use a spring-loaded mechanism to raise and lower, eliminating strangulation risks. They’re slightly more expensive but worth it for safety and a cleaner look.
• Cleaning & Maintenance
Dust buildup is the biggest issue with any blinds, and vinyl is easy to clean. Use a microfiber duster or a vacuum with a soft brush attachment to wipe slats weekly. For heavier dirt or stains (common in kitchens or bathrooms), mix mild dish soap with warm water, dampen a cloth, and wipe each slat. Avoid harsh chemicals (like bleach or ammonia)—they can discolor or weaken vinyl.
Check adhesive brackets or tension rods every six months. If brackets loosen, clean the surface and reapply with new adhesive strips (most kits include extras). Adjust tension rods periodically — they loosen with use over time.
If slats become bent, gently straighten them with your hands—vinyl is flexible and should bounce back. For cracked slats, replace the blind (vinyl blinds are affordable, so replacing the entire unit is easier than finding replacement slats).
No-Drill Vinyl Blinds vs. Venetian Blinds: Which Should You Choose?
Many people wonder if no-drill vinyl blinds are a worthy alternative to Venetian blinds. The answer depends on your needs, budget, and space:
• Budget: No-drill vinyl blinds cost $20–$50 per window, cheaper than aluminum Venetian blinds ($50–$150) or wooden ones ($100+), ideal for temporary spaces.
• Sturdiness: Venetian blinds (aluminum/faux wood) are sturdier for large windows/high-traffic areas; vinyl suits small windows and renters.
• Style: Venetian blinds offer more customization (slat width, color); vinyl comes in basic hues and prioritizes function over decor.
• Installation: Vinyl takes 10–15 minutes per window (no tools); some small Venetian blinds have no-drill options, but most need drilling.
For most renters or anyone who wants a quick, affordable solution, no-drill vinyl blinds are perfect. If you’re looking for long-term, high-end window treatments, Venetian blinds are a better investment—but you can mix and match: use no-drill vinyl in guest rooms or bathrooms, and Venetian blinds in living rooms or bedrooms.
Tips for Buying No-Drill Vinyl Blinds
Not all no-drill vinyl blinds are created equal—cheap models may have weak adhesive, flimsy slats, or broken mechanisms. Here’s what to look for when shopping:
• Adhesive Quality: Choose industrial-strength brackets (brands like Command/3M); avoid generic adhesive that fails quickly.
• Reinforced Headrail: Metal-reinforced headrails prevent warping; plastic-only ones work for windows under 24 inches wide.
• Slat Thickness: Opt for 0.2–0.3 inch slats (durable, better light blockage); thin slats bend easily.
• Warranty: A 1–2 year warranty covers adhesive failure and defects, adding peace of mind.
• Size Options: Measure first — most brands fit 24–36 inch windows; use tension rods or Venetian blinds for larger sizes.
No-drill vinyl blinds are a practical, affordable choice for hassle-free window treatments without permanent damage. With the buying tips above and proper prep, measuring, and care, they deliver privacy, light control, and durability for years — even versus pricier Venetian blinds. Remember, the key to success is choosing the right size, prepping the surface correctly, and maintaining them regularly. Whether you’re a renter, a new homeowner, or just someone who hates drilling, no-drill vinyl blinds prove that convenience doesn’t have to mean sacrificing quality.
Post time: Mar-04-2026