There’s something timeless about Venetian blinds. They blend sleek esthetics with unbeatable light control, making them a staple in kitchens, bedrooms, and home offices alike. But if you’ve ever stared at a box of Venetian blinds, wondering how to turn a pile of slats, brackets, and cords into a polished window treatment, you’re not alone. Many homeowners dread the installation process—worried about mismeasuring, damaging walls, or ending up with blinds that won’t open, close, or hang straight.
The good news? Installing Venetian blinds doesn’t require a professional handyman or a toolkit full of specialized gear. With the right preparation, a little patience, and this no-nonsense guide, you can achieve a flawless install that looks like it was done by a pro. Plus, we’ll touch on key details like Venetian blinds slat size, cordless Venetian blinds, and inside mount vs. outside mount Venetian blinds—so you can make informed choices tailored to your space.
Get to Know Your Venetian Blinds (and Avoid Common Mistakes)
Before you pick up a drill, take a minute to familiarize yourself with your blinds and the unique needs of your window. The biggest mistakes in Venetian blinds installation start with poor planning—like choosing the wrong mount type or grabbing the wrong hardware. Let’s clear up the basics.
• Inside Mount vs. Outside Mount: Which Is Right for You?
The first decision you’ll make is whether to install your Venetian blinds inside the window recess (inside mount) or outside of it (outside mount). This choice depends on your window size, trim, and esthetic preferences.
Inside Mount: Ideal for windows with a deep, even recess (at least 2 inches deep). Inside mount blinds sit neatly within the window frame, creating a clean, streamlined look. They’re perfect if you want to highlight your window trim or keep the blinds flush with the wall. For a proper fit, you’ll need to measure the width and height of the recess accurately—we’ll cover measuring in detail next.
Outside Mount: Great for narrow recesses, windows without trim, or if you want to cover more of the wall (and block more light). Outside mount blinds are installed above the window frame or on the wall surrounding it. They can make small windows look larger and are easier to install if your recess is uneven. When measuring for outside mount, add 2–3 inches to the width and height of the window to ensure full coverage.
• Venetian Blinds Slat Size: Does It Matter for Installation?
Venetian blinds come in a range of slat sizes, typically 1 inch, 2 inches, or 2.5 inches. While the slat size doesn’t change the core installation process, it can affect how you handle the blinds during setup. Larger slats are heavier, so you may need an extra set of hands to hold the blinds in place while attaching them to the brackets. Additionally, larger slats may require sturdier brackets (most kits include the right hardware, but double-check if you have oversized blinds or are installing on drywall).
Cordless Venetian blinds are another popular option, especially for homes with kids or pets. They use a spring-loaded mechanism instead of cords, so installation is similar to corded blinds—but you’ll need to test the lift and tilt function carefully to ensure the mechanism is aligned correctly.
Tools & Materials You’ll Need (Grab These First!)
Don’t start installation only to realize you’re missing a screwdriver. Gather these tools and materials beforehand to keep the process smooth:
• Your Venetian blinds kit (includes slats, headrail, brackets, screws, and tilt/lift mechanism)
• Tape measure (preferably a metal one for accuracy)
• Drill (cordless is easiest) with drill bits (1/8 inch for pilot holes)
• Screwdriver (Phillips or flathead, depending on the screws in your kit)
• Level (small 2-foot level works best for ensuring brackets are straight)
• Pencil (for marking drill points)
• Wall anchors (if installing on drywall—most kits include these, but grab extras if needed)
• Safety goggles (to protect your eyes from dust)
• Optional: Stud finder (for securing brackets to wall studs, adding extra stability)
Pro tip: Lay out all the parts from your Venetian blinds kit and check the instructions to ensure nothing is missing. Manufacturers often include spare screws or brackets, but it’s better to catch a missing part before you start drilling.
Step-by-Step Guide to Installing Venetian Blinds
Now, let’s dive into the installation process. We’ll cover both inside and outside mount, so follow the steps that apply to your setup. Take your time—rushing leads to mistakes, and a 30-minute job done right is better than a 15-minute job that needs redoing.
• Step 1: Measure Twice, Cut Never (The Most Critical Step)
Incorrect measurements are the #1 reason Venetian blinds don’t fit. Even a 1/4-inch error can leave gaps or make the blinds too tight. Here’s how to measure properly:
For Inside Mount:
1. Measure the width of the recess at the top, middle, and bottom. Use the smallest measurement—this ensures the blinds fit without getting stuck.
2. Measure the height of the recess at the left, center, and right. Use the longest measurement to avoid gaps at the bottom.
3. If your recess is uneven (e.g., one side is deeper than the other), opt for outside mount instead.
For Outside Mount:
1. Measure the width of the window, then add 2–3 inches to each side (total 4–6 inches extra). This ensures the blinds cover the window fully when closed, blocking light and privacy gaps.
2. Measure the height of the window, then add 2–3 inches above the frame and 1–2 inches below. This prevents light from seeping in at the top and bottom.
Write down your measurements and double-check them before purchasing or cutting your blinds. Most retailers will cut Venetian blinds to size for free, so bring your measurements with you or provide them when ordering online.
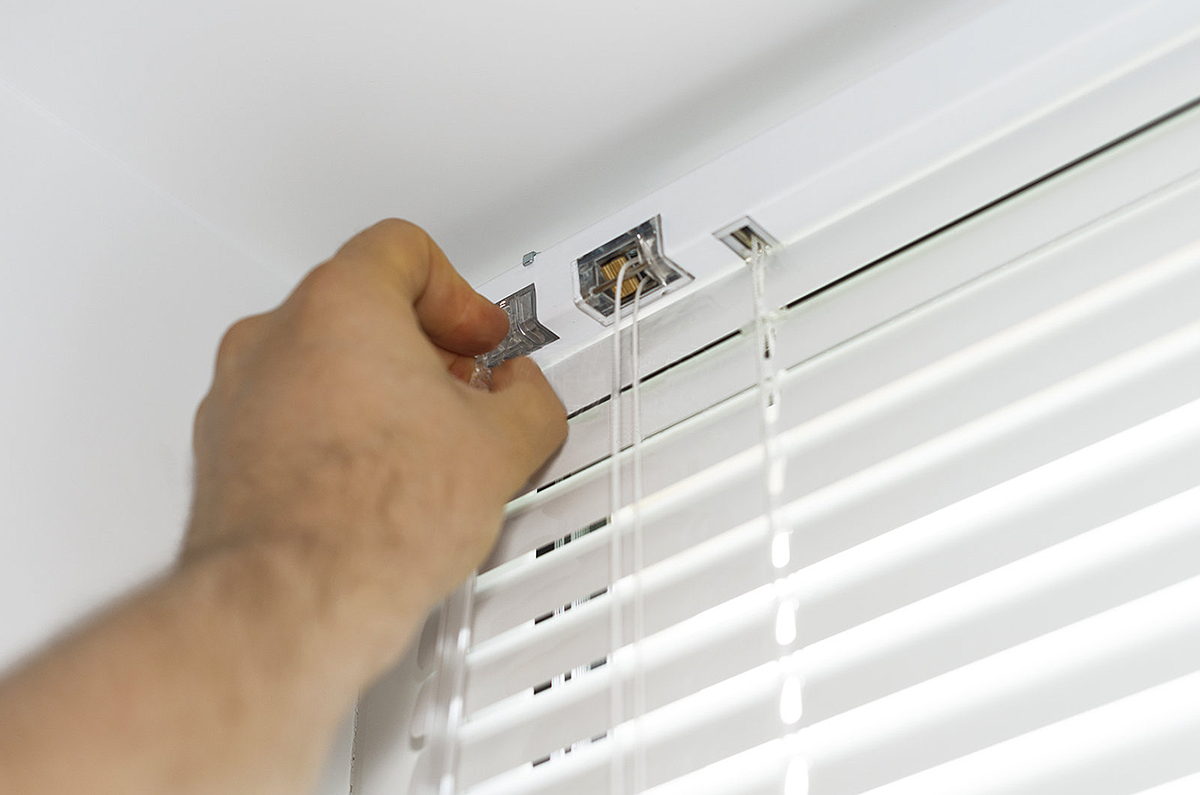
• Step 2: Mark and Install the Brackets
The brackets hold the headrail of your Venetian blinds, so they need to be straight and secure. Here’s how to install them:
1. Hold the headrail up to the window (inside the recess for inside mount, above the frame for outside mount) and position it where you want the blinds to hang. For inside mount, the headrail should sit flush with the top of the recess. For outside mount, leave 2–3 inches above the window frame to allow the blinds to lift fully.
2. Use a pencil to mark the screw holes on the wall or window frame. Make sure the headrail is level—place your level on top of the headrail to check. If it’s off, adjust the position until it’s straight.
3. Remove the headrail and drill pilot holes into the marked spots. If you’re installing on drywall, insert wall anchors into the pilot holes (tap them gently with a hammer until they’re flush with the wall). If you’re installing on wood (window frame or stud), you can skip the anchors—screws will hold directly into the wood.
4. Attach the brackets to the wall using the screws provided in the kit. Tighten them firmly, but don’t over-tighten (this can strip the holes or damage the brackets).
5. For wider Venetian blinds (over 36 inches), add a center bracket to support the headrail and prevent sagging. Most kits include a center bracket for this purpose.
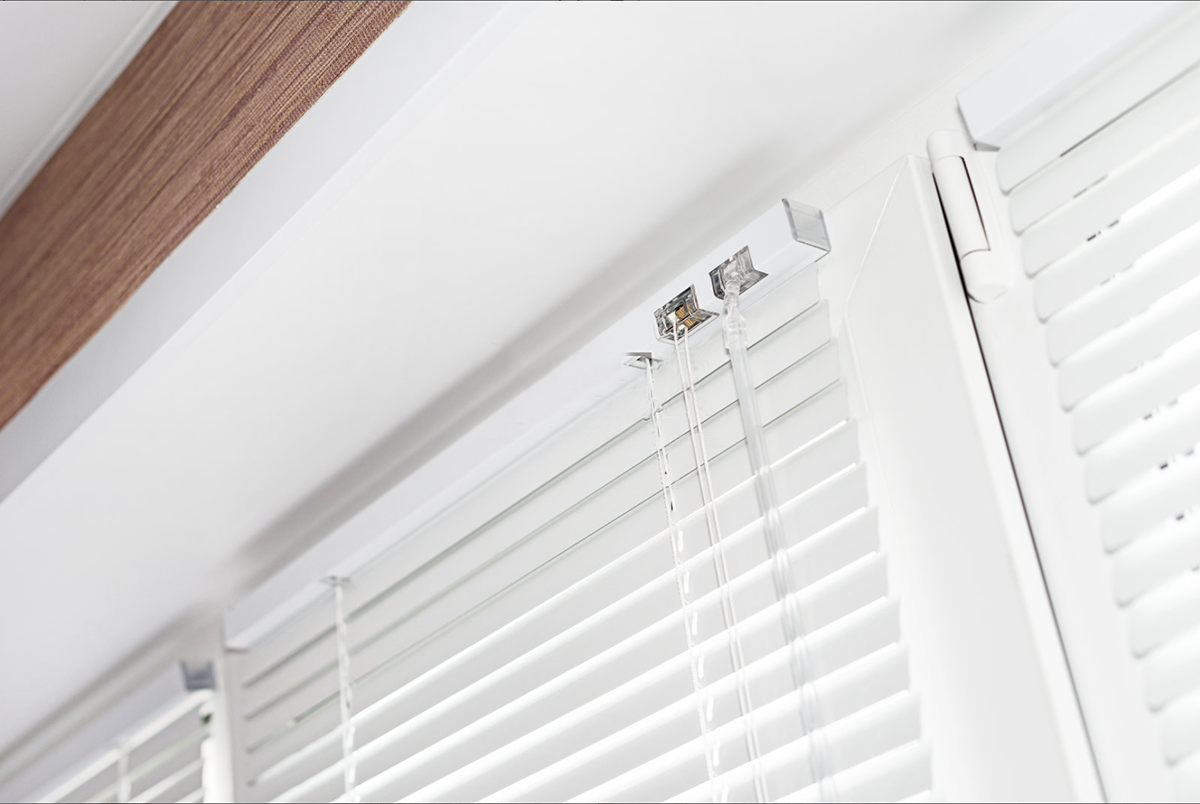
• Step 3: Attach the Headrail and Test the Mechanism
Once the brackets are installed, it’s time to hang the headrail. This step is usually quick, but take care to align everything correctly.
1. Slide the headrail into the brackets. Most Venetian blinds have a snap-in or hook-on design—you’ll hear a “click” when the headrail is securely in place.
2. If your blinds have a tilt rod (for adjusting slats) or a cordless mechanism, attach any remaining parts (e.g., tilt wand, lift cord handles) according to the kit instructions.
3. Test the lift and tilt functions before moving on. Pull the cord (or use the cordless mechanism) to lift the blinds—they should move smoothly without sticking. Tilt the slats open and closed to ensure they align properly and don’t catch on each other.
• Step 4: Install the Bottom Rail and Adjust the Length (If Needed)
The bottom rail keeps the Venetian blinds straight and weighted. If your blinds are too long, you’ll need to trim the slats and bottom rail before this step (follow the manufacturer’s instructions for trimming—use a hacksaw for metal rails and scissors for plastic).
1. Attach the bottom rail to the slats using the lift cords. Most blinds have plastic caps or clips that secure the cords to the bottom rail—simply thread the cords through the holes in the rail and fasten them in place.
2. Test the blinds again to ensure the bottom rail hangs straight and the slats move evenly. If the blinds are uneven when lifted, adjust the cord lengths (most kits have a small adjuster near the headrail).
• Step 5: Add Finishing Touches
Once everything is working correctly, clean up any dust from drilling and add any decorative elements (e.g., valances, end caps) included in your kit. Valances cover the headrail for a more polished look—they usually snap onto the headrail or attach with screws.
Pro tip: For cordless Venetian blinds, test the lift mechanism a few times to break in the spring—this ensures smooth operation over time. For corded blinds, use cord cleats (included in most kits) to secure excess cord to the wall, keeping them out of reach of kids and pets.
Troubleshooting Common Venetian Blinds Installation Issues
Even with careful planning, you might run into a few hiccups. Here’s how to fix the most common problems:
• Blinds won’t hang straight: Check if the brackets are level. If one bracket is higher than the other, loosen the screws and adjust until the headrail is level. For inside mount, uneven recesses can cause this—add shims under the lower bracket to level it out.
• Slats stick when tilting: Make sure the tilt mechanism is aligned correctly. If the slats are misaligned, remove the headrail and reattach it, ensuring it’s fully seated in the brackets. You can also gently adjust the slats by hand to realign them.
• Blinds are too tight/too loose: For inside mount, if the blinds are too tight, trim 1/8 inch from the width (if possible) or sand down any rough edges on the recess. If they’re too loose, add foam tape to the sides of the headrail to fill gaps.
• Cordless mechanism isn’t working: Check if the headrail is securely attached—loose brackets can misalign the spring mechanism. If it’s still stuck, contact the manufacturer for a replacement part (most cordless mechanisms have a warranty).

Your Venetian Blinds Installation Questions Answered
We’ve compiled the most common questions we get about installing Venetian blinds to help you feel confident in your project.
Q: Can I install Venetian blinds on a metal window frame?
A: Yes! You’ll need a drill bit designed for metal (titanium or cobalt) to drill pilot holes. Avoid over-drilling—metal frames are thin, and you don’t want to damage them. Use self-tapping screws for a secure fit, or consult a professional if your frame is particularly thin.
Q: How long does it take to install Venetian blinds?
A: For a single window, installation takes 30–45 minutes if you’re a beginner. If you’re installing multiple blinds or have complex window shapes (e.g., bay windows), plan for 1–2 hours. Cordless Venetian blinds take a few extra minutes to test and break in the mechanism.
Q: Do I need to hire a professional for large Venetian blinds?
A: Not necessarily, but large blinds (over 48 inches wide) are heavier, so an extra set of hands helps. Make sure to use a center bracket for support, and if you’re installing on drywall, use heavy-duty anchors to hold the weight. If you’re unsure, a professional can install them in 15–20 minutes per window.
Q: Can I install Venetian blinds over existing window treatments?
A: Yes—opt for outside mount to avoid crowding the recess. Measure the width and height of your existing treatments and add extra inches to ensure the new blinds cover them fully. Just make sure the brackets are installed securely, as the added weight of two treatments may require sturdier hardware.
Q: How do I clean Venetian blinds after installation?
A: Use a microfiber cloth or duster to wipe down the slats and headrail. For deeper cleaning, mix warm water and mild soap, dip a cloth in the solution, and wipe each slat (avoid getting water on the mechanism). For cordless Venetian blinds, be gentle around the lift mechanism to avoid damaging it.
With the troubleshooting tips and FAQs covered, you’re fully prepared to tackle your Venetian blinds installation with confidence. This simple DIY project adds both value and style to your home, and by following the steps outlined—taking care to measure accurately, level brackets properly, and test mechanisms thoroughly—you’ll avoid common missteps and end up with blinds that fit perfectly and function smoothly. Patience is key here; rushing through any step can lead to frustration later, so take your time to get each part right.
Whether you’re switching to cordless Venetian blinds for family safety, opting for a sleek inside mount to showcase your window trim, or pairing large-slat blinds with your kitchen decor, this guide has you covered. The best part of a DIY install is the pride that comes with knowing you did it yourself—no professional help needed, just a little preparation and attention to detail. With that extra care, your Venetian blinds will not only look polished but also stand the test of time.
Post time: Feb-11-2026